Monday, September 23, 2013

Whole-Wheat Sugar Free Vanilla Cupcakes with Whipped Cream Frosting


They're definitely not the prettiest... BUT, and this is a BIG BUT, they are whole wheat and sugar free!! Ever since we started our adventure of cutting out processed and refined foods I haven't been baking as much as I'd like to and so I knew I had to find someway to mix the two! Now if you're anything like my mom you are probably thinking "EW! That is not even a cupcake then!"... or at least that's what she said. However, once she ate one, she ate another... and she reluctantly admitted that they were good and if she didn't know she would have no idea they were whole-wheat and sugar free. Win! I took one of my favorite traditional vanilla cupcakes and played around with it and got a delicious whole-wheat, sugar free cupcake! 


 I started with the butter, honey, and maple syrup and decided to "cream" it the way I normally would with butter and sugar. I turned my mixer on medium/low and let it go. I decided it was creamed together enough once it had become an creamy mixture like the picture on the right.


I then whisked together the flour and baking powder.


Once the butter mixture was where I wanted it, I added the four eggs one at a time. After that I slowly added the flour and then added the milk, heavy cream, and vanilla mixture and mixed away! 


I used my ice cream scoop to measure out my batter and then got them in the oven!


I was thrilled when they came out looking like cupcakes! So of course we hurried and test tasted one pre-frosting and yum! So good! 


Since the cupcakes were a success, I whipped up some sugar free whipped cream and voila! 

- - - - - - - - - - - - - - - - - - - - - - - - - - - - - - - - - - - - - - - - - - - - - - - - - - - - - 
Whole-Wheat Sugar Free Vanilla Cupcakes

Ingredients

Cupcakes:
1-cup clover honey
¼ 100% Grade A Maple Syrup
1-cup butter
4 eggs
2 tbsp. vanilla extract
3 cups white whole-wheat flour- sifted
3½ tsp. baking powder
¾ cup milk
¼ cup heavy cream 

Whip Cream Frosting
1-cup heavy cream
½-1 tbsp. 100% Grade A Maple Syrup
1 tbsp. vanilla extract

Directions

Cupcakes:
1.    Preheat oven to 350º, line cupcake pans with paper liners.
2.    In the bowl of a stand mixer, cream butter, honey, and maple syrup until thick and creamy.
3.    Add eggs one at a time, being sure to mix well after each addition.
4.    In a separate bowl whisk together flour and baking powder.
5.    With mixer on low slowly add flour mixture to butter, mix well.
6.    Mix milk, heavy cream, and vanilla. Add to flour and butter mixture, mixing well.
7.    Divide evenly between cupcake pans, about 2/3 full.
8.    Place in oven and immediately turn oven down to 325º. Bake for 15-20 minutes.

Buttercream:
1.    Place bowl of your stand mixer in the freezer for 5-10 minutes.
2.    After your bowl is nice and cold add heavy cream, maple syrup, and vanilla.
3.     Beat on high until stiff peaks form. 


Try them out and let me know what you think! 
Thanks for coming, stay awhile, and return often! xoxo

Wednesday, September 18, 2013

Yellow Cupcakes with Chocolate Buttercream


 Since I've started my student teaching this semester I have met some really great teachers. One of those great teachers requested yellow cupcakes with chocolate frosting... both of which I had never made from scratch. So I did a little research on the difference between white, yellow, and vanilla cake and found out that white cake is normally made using only egg white, yellow cake is made using whole eggs, and vanilla cake is made with more vanilla and either as a white vanilla or a yellow vanilla. Once I found that out the adventure began and out came yummy yellow cake and chocolate buttercream! 


I wanted this to be as easy as possible so I only wanted to use one bowl.... therefore, I forwent the creaming the butter and sugar and instead "extra softened" the butter in the microwave until just before melting. Without having to cream the butter and sugar I was able to mix all the dry ingredients in my mixer first. Next, I added the liquid ingredients, and lastly the eggs--one at a time. 


I must say one thing that has made my life so much easier is my ice cream scoop turned cupcake scoop! It makes getting the batter into the cups immensely easier! I won't lie, I'm not the cleanest in that process so having a scoop has made it so much smoother! Definitely worth the $15 I spent on it! 


As always, I preheat my oven to 350º and then turn it down to 325º when I put the cupcakes in the oven. This does often increase my bake time but it seems to bake them more even and helps them rise better and not sink in during the cooling process. 


Since I had never made chocolate frosting before I just kind of guessed and luckily it came out! I took my traditional buttercream recipe and added cocoa powder and hoped for the best and yumm! So good and so easy!! 


Since I was taking these to school I wanted to dress them up a bit so I bought these super cute boxes (on sale, no less!!) at Joann's. 
- - - - - - - - - - - - - - - - - - - - - - - - - - - - - - - - - - - - - - - - - - - - - - - - - - - - - - - - -
Yellow Cupcakes with Chocolate Frosting

Ingredients

Cupcakes:
2 ¼ cups all-purpose flour
1 2/3 cups granulated sugar
3 ½ tsp. baking powder
1 tsp. salt
1 ¼ cups heavy cream
1 ¼ tbsp. vegetable oil
½ cup milk
1 stick butter, softened to almost melted
1tbsp. vanilla extract
3 large eggs

­Frostings:
1 cup (2 sticks) butter
1 ½ tsp. vanilla
6-7 cups powdered sugar
1 cup unsweetened cocoa
2/3-1 cup heavy cream


Directions

Cupcakes:
1.  Heat oven to 350 degrees. Line cupcake pan with paper liners.
2.  In the bowl of your stand mixer mix together flour, sugar, baking powder and salt. Mix     
     well.
3.  Add heavy cream, oil, milk, butter, and vanilla extract. Mix well.
4.  Add eggs, mixing well after each addition.
5.  Beat for 2 minutes on medium/high.
6.  Scoop into cupcake pan about 2/3 full.
7.  Put pans in the oven and immediately turn oven down to 325­º.
8.  Bake for 17-23 minutes or until toothpick comes out almost clean.
9.  Cool on cooling rack.

Frosting:
  1. Cream together the butter and vanilla.
  2. In a separate bowl sift together powdered sugar a cocoa.
  3. Add part of the powdered sugar cocoa mix to the butter and vanilla.
  4. Add part of the heavy cream.
  5. Continue switching back and forth until desired consistency.

Thanks for coming, stay awhile, and return often! xoxo


Monday, September 16, 2013

Turkey Meatballs, Whole-Wheat Calzones, and Whole-Wheat Pizza

I spent the majority of the day in the kitchen! I made calzones, meatballs, pizza, hummus (which was a disaster), and some more granola! I made some turkey meatballs mini sized for our calzones, and some golf-ball sized ones that I froze for either spaghetti another night or maybe meatball sandwiches?! I am a big fan of making large batches and freezing so that I don't always end up in the kitchen making stuff! 

The meatballs are super easy, just a little messy since you really need to use your hands to mix up the ingredients real good! 


After getting the meatballs in the oven I made the dough. Both the calzones and the pizza use the same dough so I made four batches of it-- my stand mixer isn't big enough to hold more than one batch at a time. This was my first time making dough that used yeast so I was a little nervous but it was so easy! 


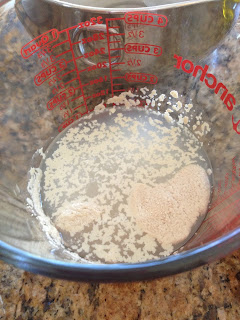
You drop the yeast in warm water and let it rest and it expands and works its magic!

After the yeast rests you mix in the olive oil and salt and stir gently before adding it to the flour!


I made mine in my stand mixer using the dough hook and it did all the work.


After the dough is made I oiled a bowl with olive oil, put the dough in, and covered it to let it rise... and rise it did! I would say the dough easily doubled in size.


While the dough was rising I made the cheese part of the fillings for the calzones. I mixed ricotta, parmesean, and mozzarella. Yumm! 


I used my new tortilla press to "roll out" the dough for the calzones and it was so easy and made them the perfect size and thickness. 


I placed the filling on one side of the calzone and then pulled over the other side and used a fork to seal them. I poked holes in top to help them from exploding out the sides. I was able to make 6 calzones from each ball of dough.


I froze all of the calzones (after we sampled one, of course) which will make for a very easy lunch or dinner when we don't have the time for something else! 


We like our pizza crust to be on the thin side so I was able to make 2 pizzas out of the one ball of dough and the thickness was perfect for what we like!


My "half" of the pizzas was mozzarella, parmesan, olives, and a little sauce. The other half was a LOT of sauce, turkey pepperoni, and olives. 

- - - - - - - - - - - - - - - - - - -  - - - - - - - - - - - - - - - - - - - - - - - - - - - - - - - - - - - - - 
Homemade Turkey Meatballs


Ingredients
·      1 lb ground turkey
·      ¾-1 cup breadcrumbs
·      1/3 cup parmesean cheese grated
·      2 eggs
·      garlic powder to taste
  
Directions
·      Preheat oven to 425º
·      Mix together all ingredients, I think the best way is with your hands
·      Roll them into the desired size ball
·      Put on a cookie sheet
·      Bake for 10-15 minutes


Thanks for coming, stay awhile, and return often! xoxo